Our first full restoration project...
1960 Standard Ensign
Built in 1960 at Canley by The Standard Motor Co. Ltd., our car is registration number 761 AYX, Chassis No. EN 16878-DL. The price of the car when new was £850 including purchase tax.

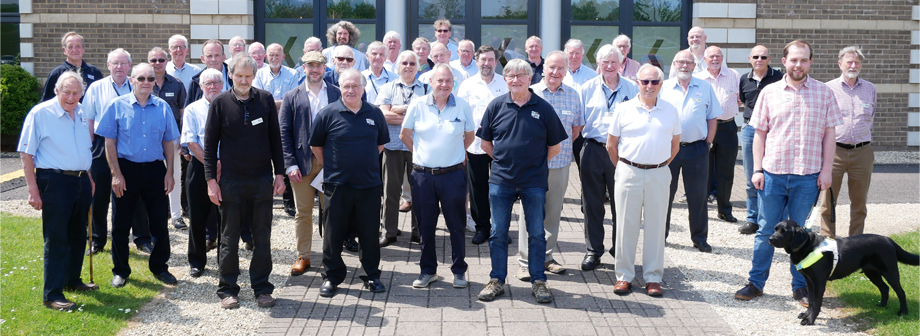
All smiles as the volunteers pose alongside their next project
The car’s history is a bit vague, but it was donated to the collection in 1982 by its previous private owner. Since the Trust acquired the car it has remained in storage and has never been on display in the museum. This situation is similar to a large number of vehicles that are owned and stored by the Trust and is one of the main reasons for the planned Museum Collections Centre. The Trust will then be able to display for public view all the vehicles, whatever their condition, in its large collection.


Anyway, our task is now to restore the vehicle to its original state with all components in full working order. If this is achieved 761 AYX will then hopefully be passed as road legal so volunteers can drive it to events where the Heritage Motor Centre (HMC) has a presence.
The experts amongst us quickly observed that some items of trim on the car are from the Vanguard model produced by Standard at the time. Our intention is to now source and fit all the correct items, restoring the vehicle to its original specification.
One of the first things everyone wanted to know was, would the engine start up and run? So, following a quick power wash, check over and the customary shout of “gentlemen start your engines”, we all waited. Alas, despite several efforts it just didn’t want to run. The reason was quickly identified following the removal of the cylinder head, when it was found that three exhaust valves were well and truly stuck.


A quick clean and check over, but it was never going to start with stuck exhaust valves
One of our first tasks as volunteers on being recruited in 2012 was to survey the condition of every vehicle in the HMC collection. The Ensign was amongst the first vehicles to be inspected and we had to rate the condition of the exterior, interior and engine bay area. This was based on a 1 to 5 score system for each of the three areas, where 1 was Excellent and 5 was Poor – we then took an overall average to assess the general condition. The average score for the Ensign was 3.67, but as you’ll discover in forthcoming blogs, we may have been a bit generous.
1960 Standard Ensign - Continued...(Part 2)
Standard Ensign - a closer inspection.
My previous blog introduced our 1960 Standard Ensign, the volunteer’s first full restoration project. I should perhaps mention now that this project actually started at the end of July last year, so I have a bank of six months’ photography and progress on which to reflect.
In the first blog I briefly described our vehicle survey scoring system, mentioning the Ensign scored 3.67 out of 5, where 5 is Poor. The reasoning behind this was to give the museum’s Curator a rough idea of the state of all the vehicles in the Trust’s collection. However, our inspection of the underside of all vehicles was very much limited as we had to rely on the slimmest among us crawling underneath with a torch. Putting the Ensign on a proper ramp and having a really close inspection and poke with a screwdriver quickly revealed that we might have a real challenge on our hands. The dreaded four letter word feared by all restorers - RUST – was clearly widespread and in some places quite severe.


Oh dear, a couple of prods with a screw driver quickly revealed the challenge ahead
It also became apparent that a series of amateur repair welds had been carried out on the underside of the chassis. This would have been done during the 22 year period between 1960 and 1982 most of which was now covered in a generous covering of black sealant.
We shouldn't have been that surprised though. Vehicles of this age and design are always prone to rust and corrosion if not treated with kid gloves during their lifetime. The tell tale signs were all there to see, rust around hinges, headlamp surrounds, floorpan joints, wheel arches, bottom sills, engine bay – in fact all the usual places.


The tell tale signs of rust and corrosion were there, but nothing like underneath the car


The engine bay and generous coatings of sealant on the underside
So, as you may have guessed, it was already obvious at this early stage that Ensign 761 AYX was in a fairly sorry state. Ahead of us we were clearly going to be faced with many hours of hard work and labour, some pondering and debating, but hopefully in the end a rewarding experience.
1960 Standard Ensign - Continued...(Part 3)
Dismantling starts
As reported in my first blog, three stuck exhaust valves, scuppered any chances of getting the Ensign’s 1670cc engine to start up. So, one of the first dismantling jobs was to remove the dynamo, distributor, coil, starter motor, water pump, exhaust downpipe and silencer, manifolds and propshaft. The engine itself however would have to remain in situ until HMC’s workshop manager returned from holiday when proper lifting gear could be made available.


Lots of items awaiting removal Exhaust and manifold removed


Water pump removed Engine – now ready for removal
General dismantling of all the trim items now followed. As was touched upon earlier, our Ensign did on closer inspection have a number of foreign parts fitted from other Standard models. These included a chrome headlamp and tail lamp rims, twin front side and flasher lamps on chrome surrounds, a reverse lamp and a lidded glove box. In addition some optional equipment was fitted, like front disc brakes and servo and front and rear overriders.
With different teams, usually comprising three or four people per day, working on the car every week it was particularly important that such a large project was properly coordinated. This was achieved by the completion of a daily log, recording the work carried out, together with an itemised list of any outstanding tasks. The log would also contain specific requests or advice relating to work in progress as well as suggestions on what area of the car should be tackled next. All this information was backed up with detailed photographs and the labelling and storage of all parts as they were removed from the car.


Back to school – filling in the daily log Labelling and storing all the parts
Next time – engine out and the doors come off.
1960 Standard Ensign - Continued... (PART 4)
Dismantling continues
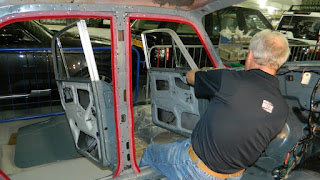
This week’s blog on the Ensign project is a pictorial account of the long and sometimes laborious task of dismantling. This is a job that can’t be rushed and one which also requires the detailed labelling, photographing and then storage of all items removed.


Engine and gearbox are removed and the poor state of the subframe is revealed


Front seats out and doors off Headlamps off, labelled and ready for storage


Boot lid off and rear window out Rear doors removed
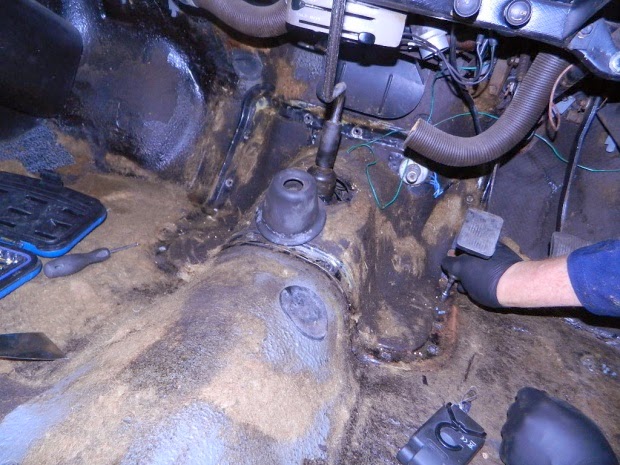

Removing the gearbox cover panel Brake and clutch pedal assembly removed


Removal of back seat reveals fuel tank Stubborn task, but the rear axle is out


Our Ensign has optional front disc brakes Removing the front suspension springs
Whilst nearly all the parts removed were in a fairly reasonable condition for a vehicle of this age, the same could not be said of the body shell. The next Ensign blog will reveal its full condition and the challenge that now lies ahead.
1960 Standard Ensign - Continued... (PART 5)
A not unsurprising discovery
The removal of all parts, leaving just the bare body shell, took around four weeks to complete. This also involved photographing all components, labelling and storing the smaller items where appropriate and inspecting the more major items for any serious damage or wear. Generally speaking, for a car of this age, we found nothing alarming and certainly nothing we felt we couldn't repair or restore.
However, we all knew from just a casual inspection and a poke with a screwdriver that the body shell/chassis was not in the best of health.
As cleaning and repairing the shell was clearly going to be a major task we were fortunate that the museum was able to provide us with a new Chassis Tilter. Once some additional brackets were made up and fixed to the chassis it was bolted to the Tilter front and rear. The tilt/roll mechanism of this excellent, but simple, piece of kit was to make our task a lot easier.


The chassis tilter showing the support brackets and the set up holding the shell in place
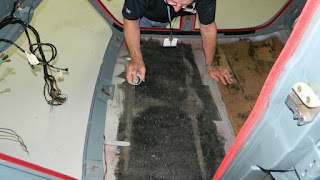
So, with the shell now stripped of parts and secure in the new tilter, the great scrape could now commence. The whole underside of the shell was covered in a lovely thick layer of black underseal, or gunge as it was often referred to. A heat gun and scraper was the best means of attack and many hours were spent completing this warm, but sticky and sometimes smelly task.

One of our oldest volunteers (Nick, who’s in his ‘80s) enjoys a bit of de-gunging
As the underseal was removed we quickly discovered far more panel rot and previous welding repairs than we initially expected. Originally we thought we could probably leave the underseal in the wheel arches, but we quickly realised that this was not now a sensible option.


Cleaning out under the wheel arches Underseal removed and we found a good bit
The more underseal we removed the more we realised that to repair the shell was going to be a a fairly major operation. Rust, corrosion and bad repairs were everywhere, particularly in the important structual areas.
Next time we’ll show you pictures of just what we discovered underneath the gunge.
1960 Standard Ensign - Continued... (PART 6)
Underneath the paint and the gunge
With all components removed from the chassis and the black sealant (gunge) scraped away the poor state of our Ensign was now clear for all to see. Severe rust, corrosion, damage and bad repairs left us in no doubt that this restoration project was going to be a real challenge.
So bad was the rust and decay in the main sills that a strengthening bar had to be welded to each side of the car for it to remain fully supported and rigid in the Chassis Tilter.
The following pictures clearly illustrate the main problem areas.
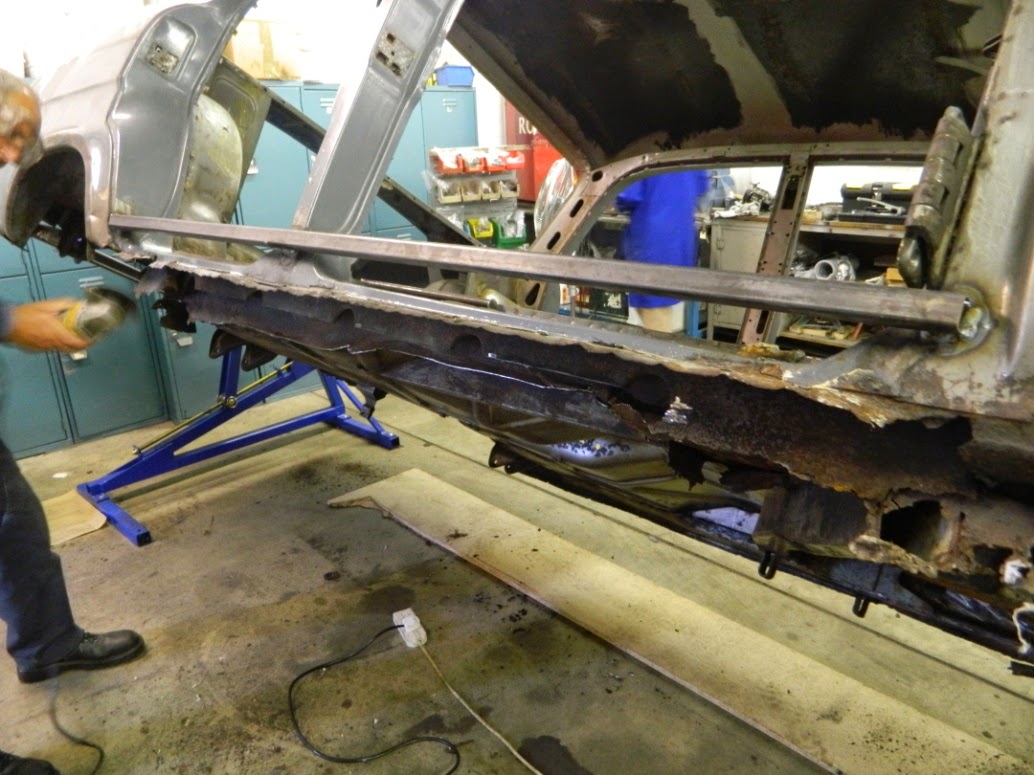
This photo shows the completely rusted sill with the worst areas of rust already removed. Also visible is one of the two strengthening bars needed to keep the chassis rigid.


These photos show more detail of the rust in front of the rear wheel arch area and around the leaf spring support, as well as the severe rust and damage to the front underneath of the car around where the chassis rails meet.

This is the condition of one of the main chassis rails which support the engine. As you can see it’s not a pretty sight and the other side was in a similar state.

Rust was not only confined to under the chassis as can be seen here. In this photo the chassis is on its side and the bottom of the front windscreen pillar can just be seen where the wire loom hangs.
Next time – Danger men at work.


Currently we have around twenty volunteers actively involved in restoring the Ensign, so it’s essential that an up-to-date log is kept. The Ensign’s manual is also never far away.


1960 Standard Ensign - Continued... (Part 7)
Volunteers at work
Every picture tells a story - goes the saying and our blog this time is more pictorial than usual, showing the volunteers at work.


Currently we have around twenty volunteers actively involved in restoring the Ensign, so it’s essential that an up-to-date log is kept. The Ensign’s manual is also never far away.


Scraping off all the underseal and then identifying and cutting out all the rust was a long job.

As volunteers, we must comply with all the relevant Health & Safety legislation. So when the sparks fly, like here when we are cutting out the rust, a Hot Work Permit is required, plus the wearing of safety glasses and footwear.


Back axle spring support U-bolts come in for some attention, whilst the workshop’s bead blaster has been a very useful piece of equipment at our disposal.


Our first look inside the engine and as you can see even Father Christmas is a volunteer.
Next time we will look at our biggest challenge yet – repairing the Ensign’s bodyshell.
1960 STANDARD ENSIGN - Continued... (Part 8)
In at the deep end and learning new skills
If you’ve been following the blog on our Ensign project then you’ll know that the underside of the car’s bodyshell was found to be in a very poor state. Rust, corrosion and previous poor repair work was found everywhere, requiring large sections to be cut out before we could progress any further.


New fabrication skills were quickly learnt as these photos clearly illustrate, as many of the parts and sections required replacing.
Whilst the majority of the volunteers had restored or fettled with their own classic cars, no one had faced anything like the challenge we were about to undertake. Only a couple had any real experience of welding and then only on a small scale. Added to this, it was clear that we were going to have to cut, shape and fabricate many new sections of now missing body work. We were fortunate to be able to source two new sills, but at the time of writing that was all.


Welding was definitetly a case of learn as you go for most volunteers, whilst the acquisition of a pre-fabricated sill, shown in the second photo, made one job a bit easier.
Initially at this stage of the project things started to slow down considerably as the enormity of the work ahead started to become apparent. However, following a meeting of all the volunteers, a coordinated plan was put in place, team leaders were briefed and our collective energy was restored.


The repair work and strengthening to the engine support chassis beams is clearly shown here.
Whilst there is still a lot of work to be done on the bodyshell real progress is now being made. Most of the main fabrication work has been completed and soon the serious job of welding it all together can begin in earnest.
1960 STANDARD ENSIGN - Continued... (Part 9)
The engine
After the main body shell/chassis the engine is probably the next most important element in any major restoration project. Therefore, whilst work continues on the former, the engine has also been getting some much needed attention.


The engine as we found it The discovery of sticking valves
It's a simple 1570cc in-line 4 cylinder petrol engine with two overhead valves per cylinder and a single down draught Solex carburettor. As explained in our first blog, despite a lot of effort, we couldn't get it to start as it was subsequently found that two valves were well and truly stuck.


Block and head awaiting inspection Cylinders being honed
So after removing all the ancillary parts the engine was carefully lifted out of the car and then completely stripped down. Initially, except for the stuck valves, all looked reasonably OK, but on much closer inspection it was noticed that the head was cracked.
The view is that the crack can be welded and machined, or we could try and source a new head. At the time of writing this a decision has yet to be made on which way to go.


Main crankshaft is inspected Reassembled big ends and crankshaft
Another item, or items, we are trying to source are a set of piston rings. If anyone out there reading this can help us then we'd love to hear from you. This can be done either via the Comments section at the bottom of the Blog or by giving our Volunteer Co-ordinator Sonja Dosanjh a call on 01926 645027.
On a more positive note the bores have been honed and the big ends and main crankshaft have been inspected, cleaned and reassembled with new shells.
Obviously with an engine there are many ancillary parts, but generally apart for a good clean and overhaul, most seem to be fine and require little attention.
1960 Standard Ensign - Continued...(PART 10)
A big challenge
This blog has rather neglected our restoration of the Standard over recent weeks, mainly because progress has been slow. This is certainly not due to any lack of enthusiasm, but simply because the nature of the work required on the car has been very difficult and at times testing. It should be remembered that the chassis/body of our Ensign model was in a very sorry state – beyond repair, some thought. Added to this our collective experience and knowledge of metalwork and welding at such a demanding level was somewhat limited.
However, being thrown in at the deep end, is a challenge that the volunteers clearly love and whilst minor errors have been made, overall the quality of the repair work so far undertaken has been remarkable.


Pictures best illustrate the problems that were faced and no more so than the repair and rebuilding of the sills as shown above. The two sills themselves were the only items we were able to source prefabricated. Everything else had to be measured, cut, and then moulded or shaped.


Another difficult task has been the repair in the area around the front bulkhead and the A-pillar. The first of the above photos illustrates the dire condition of this area and the second shows the work we've completed so far, to try and strengthen and repair this critical area.
It is also worth pointing out that as we operate in a workshop that is within the confines of the Heritage Motor Centre we must of course obey all the Health & Safety that legislation now demands. This has required a lot more forethought, as we have to plan in advance to make sure all the correct paperwork and procedures are followed.
So, all the above gives you some idea as to why progress has been slow. We've learnt a lot of new skills during this time and whilst there have been some frustrating times; there is now the feeling that we've turned a corner.
Next time we’ll introduce you to three other volunteers at the Heritage Motor Centre, that most of the regular volunteers didn't even know about.
1960 STANDARD ENSIGN - (Part 11)
Engine update
Our last blog on the engine (Part 9) gave a general overview of the engine's condition following a complete strip down of all its parts. This in turn revealed one of our main concerns, that the head did indeed have a crack in it. We also needed new piston rings, which we were finding difficult to source.
So, after a thorough detailed inspection and much debate, the general consensus of opinion was that the head could and should be repaired. Also it was decided that we should insert new liners with appropriate new pistons. All this work was carried out by a local third party specialist.


These photos show the new liners in the Standard's 1570cc petrol engine and one of the new pistons.
Whilst as explained in previous blogs, the body/chassis is still a major restoration task for the volunteers, the engine and gearbox project is now progressing well.
Incidentally, when the engine was away for repair, the team that has been working on it was presented with another task: to - build a new V8 engine. Well, actually it was a very intricate and clever working model that the museum's education department wanted as a demonstrator for children. It proved quite a challenging task at times, but also very amusing and enjoyable.


1960 STANDARD ENSIGN - Continued... (Part 12)
Light at the end of the tunnel
For regular readers of the blogs on our Ensign, you'll be well aware that the repairing and renovating of the body shell/chassis has been a huge and difficult task for the volunteers. After all the rust and corrosion was removed and the previous poor repairs dealt with, we were left with a shell that many thought was beyond repair.
Where do we start? - was probably the first collective thought, as we were only able to source two prefabricated bottom sills. Everything else, and there was an awful lot of that, we'd have to make, shape and fabricate ourselves. Then, with our initial, very basic welding skills we were faced with the task of welding it all together in the best chronological order to ensure strength and safety.


The prefabricated nearside sill is almost ready for fixing, whilst the offside sill is now in place.


There's still a long way to go on this project, but there's now definite light at the end of what many thought a very long tunnel. What has become clear is that amongst the volunteers there is a vast knowledge and love of classic cars, as well as many new found skills in fabricating and welding.
-------
This latest blog coincides with National Volunteers Week (1 - 7 June), where up and down the country, organisations will celebrate and recognise the work of their volunteer helpers. The Heritage Motor Centre will be playing their part with comments on their Twitter and Facebook pages, as well as treating their volunteers each day to an afternoon cream tea.

Monday's volunteers, together with HMC Workshop Team Leader Paul and Volunteer Co-ordinator Sonja enjoy their "thank you" from the Heritage Motor Centre.
1960 STANDARD ENSIGN (PART 13)
Latest update and preparing for the move
With the new Collections Centre only a few weeks away from completion and handover, the Ensign is now being prepared for the move. Work on the car will recommence in the New Year once the new building is open and fully running.
The complete restoration and repair of the body shell is now almost complete with just one small repair patch to be welded at the base of the front nearside wing where it meets the sill. This will mark the end of 18 months' hard work by the restoration team who have done an amazing job in rescuing a shell that at one time seemed beyond repair.
So, the task now is to get the wheels back on the car ready for its forthcoming move into the new building. Simply put, we need to get the front and rear axles fitted to accommodate the wheels and then hopefully also get the steering column back in place.


When in doubt, always consult the manual


Front sub-frame in position and suspension being assembled
It was reassuring to find that with all the repair work carried out around this area, the front sub-frame bolted back on to the chassis with relative ease. All the suspension parts had been fully dismantled and refurbished and the reassembly of so many small parts back on to the sub-frame took a little time and at first a bit of confusion. However, when in doubt, always consult the Workshop Manual and Parts Catalogue, both of which came in very useful.
The rear axle assembly was more straightforward, but on the Ensign it is an extremely heavy item. However, with the aid of a hoist and the car over on its side, secured in the tilt frame, the axle was refitted without too much trouble.


With the aid of a hoist and the car tilted, the rear axle was fitted
The leaf springs were fitted first and again the securing bolts and the new rubber bushes all lined up correctly on the repaired and strengthened chassis plates.
The refitting of the axles has marked quite a turning point for the restoration team for at last reassembly of the car has actually started. The wheels will shortly be fitted, which will then allow us to push the car across to its new home in the Collections Centre. Work on it will continue there, but this time in full public view.
1960 STANDARD ENSIGN (Part 14)
Work recommences in new location
Regular readers of this blog may have been wondering what has happened regarding our Ensign restoration project. Well, for a couple of months, not a lot really, work had to stop and the project was mothballed because of the complete refurbishment of the museum.
However, all that is now behind us and as was mentioned in the last restoration blog the Ensign now has a new home in the Collections Centre, which opened on 13 February. Installed on the first floor, the restoration of the Ensign can be viewed by all visitors to the Collections Centre, who also now have the opportunity to discuss anything with the volunteers.

Installed in its new location, the unpacking and sorting begins
One of the first jobs the restoration team needed to complete was the cutting, shaping and welding of the final piece of bodywork repair. This was a small section of bodywork at the base of the nearside front wing, which lines up with the bottom sill. It is not possible to weld in the car’s new location, so it was somewhat unfortunate that time ran out to complete this final bit of the jigsaw before the move.
However, given what has already been achieved on repairing this car, this was a problem easily solved. The following sequence of photos illustrates well what this final repair entailed and the skills our mostly untrained volunteers have acquired during this project.


The area for repair is cleaned and prepared, whilst the new section is cut and shaped


Clamped in place, the repair looks good. The wing is then removed and the new section spot welded
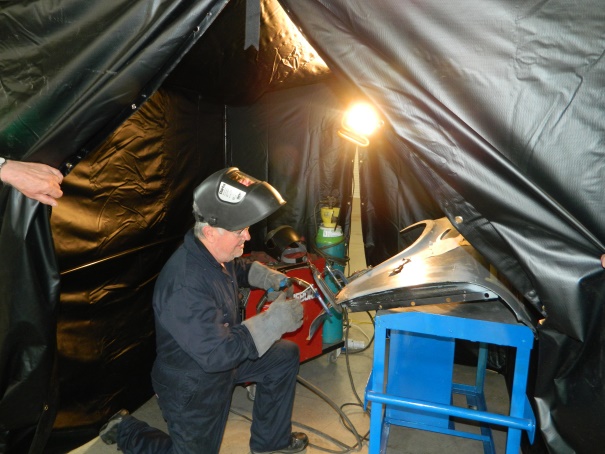

Final weld is completed in the workshop tent and then the wing is refitted and the repair finished
This repair marks the end of the body and chassis restoration and the refitting of parts and components has now started. Further blogs will continue to update you with progress, but why not visit the new Museum and Collections Centre and see the project yourself.
1960 STANDARD ENSIGN (Part 15)
The painting starts
The slight fragrant smell of paint around the Ensign in recent weeks is a good indication that one of the final restoration tasks is now well underway. Whilst the body shell interior, engine bay and underside were all hand brush- painted some time ago, the exterior is now receiving attention.

The engine bay was hand painted by brush
As the Museum no longer has a paint booth available for resprays, and sending the shell out to a third party would have blown our restoration budget, the volunteers had to come up with an alternative solution. Hand spray cans, brush and rollers were all considered. Because of where the Ensign is situated in the new Collections Centre, spraying, even via aerosols, was not going to be permitted. The choice therefore, was essentially, between brush and roller.


Careful roller application and the nearside rear awaiting a rub down
The final decision was made a lot easier, thanks to volunteer John Rathbone, who took the bonnet home to do a bit of experimenting. Trying both methods - his skill, effort and a fair bit of elbow grease showed that the careful application of paint by roller was the best option.


Painting, rubbing and polishing – the effort well illustrated
So, after the initial brush-painted coat of grey primer, the rolling of the carefully matched Ensign Grey Wing synthetic coach enamel gloss paint began. As many readers will know, the dreaded orange peel effect is always something that catches the eye of even the casual observer of a car’s paintwork. To combat this, a lot of effort has been put into rubbing the paintwork down between coats with a special restoration compound. After three coats and a lot of polishing, the results to this writer’s admittedly untrained eye, already look excellent.

The dashboard and door cappings have also recently been repainted
Ironically, any further work on the Ensign has now had to stop for a few weeks because of, guess what? More painting! The Collections Centre’s first floor, where both the Ensign and the Museum’s reserve collection are situated, is being sealed and painted. The fragrant smell of paint is with us again.
1960 STANDARD ENSIGN (Part 16)
Assembly now well underway
It’s been some time since our last blog on the Ensign, which covered the decisions and processes regarding the vehicle painting. Whilst some areas of the bodywork will still require final attention, the rewarding job of assembling all the components, including the engine, is now well underway.
The saying goes, “every picture tells a story” and the following photos clearly illustrate some of the work the restoration volunteers have undertaken recently. It is perhaps worth reminding readers that this whole restoration project has been done by different teams of volunteers working on different days, and been coordinated by a log written up after each day.
The first of these photos shows the new door seals that were required being fitted. The second shows glue being applied to the roof interior prior to the sound proof padding being attached. At this stage the car was still attached to the swivel vehicle frame, which allowed the car to be worked on at various upside down angles.
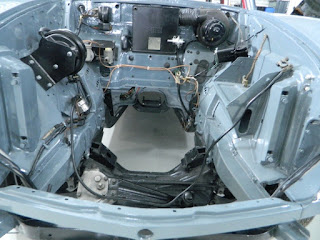
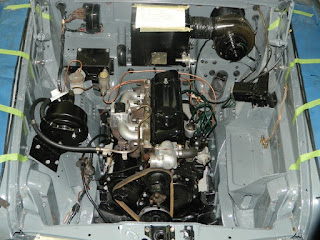
These photos clearly show the engine bay before and after the engine was fitted. Again some new parts were required as can be seen, with a new brake servo on the left and new copper brake pipes in the centre.
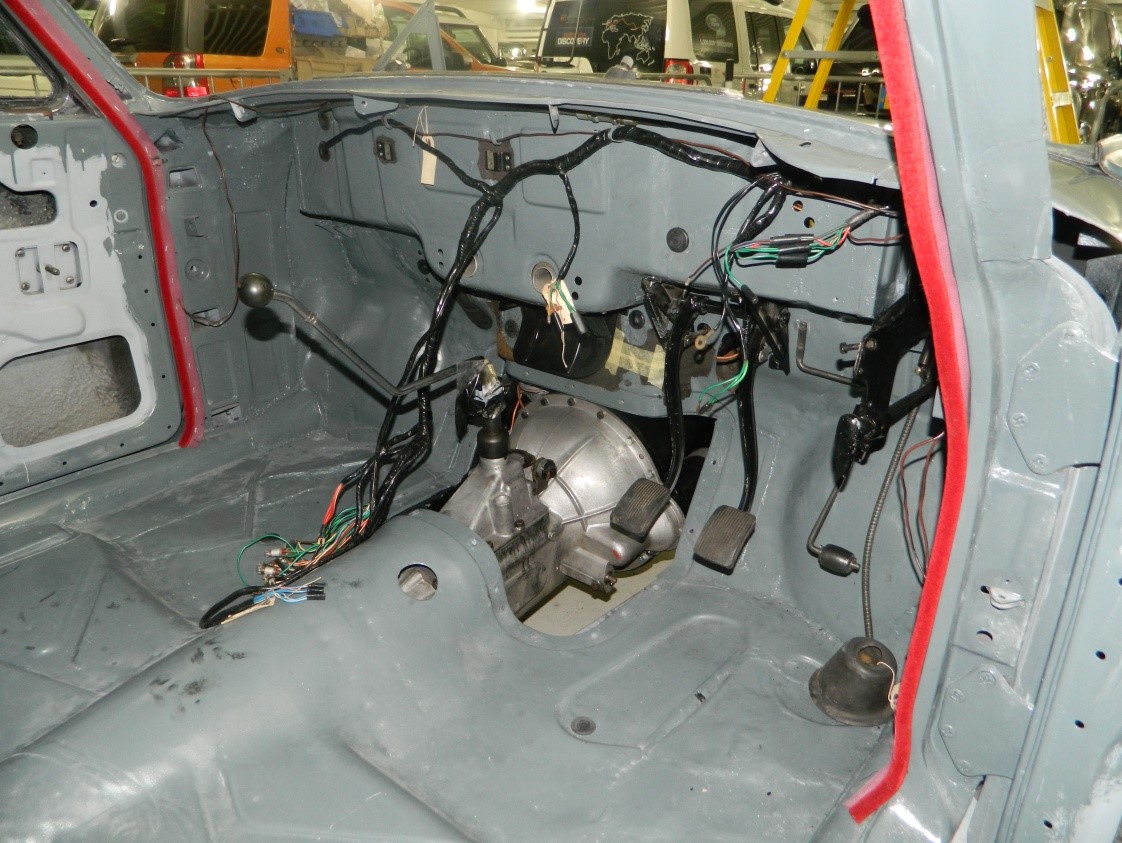
With most of the wiring now installed in the car, things like the front and rear lights can be fitted

Following the installation of the engine, the gearbox has now been fitted as well. As you can see the interior wiring looms are now all in place, so one of the next tasks will be to fit the dashboard and all the instruments.

So, as this last photo shows, our Ensign is looking something like its original self again. There are still a lot of fiddly jobs to be done and a few minor problems to solve, but at long last the end is in sight.
Don’t forget when visiting the British Motor Museum you can see the Ensign being worked on. It’s situated on the first floor of the Collections Centre and the volunteers will be only too happy to chat to you and answer any queries you may have.

However, the most encouraging news on the project for some time has been that the engine, now installed with all its ancillaries, was at last fired up recently for a short period. Just to recap the engine is a 1670cc OHV straight four, which we believe had done around 83,000 miles. The block had a slight crack, which we’ve had professionally repaired and new pistons and rings have been fitted. A new water pump was required and the original radiator was refurbished with a new core. Given that the car currently resides on the first floor of the Collections Centre a further running and testing of the engine won’t be possible until we can move it into the workshop. The fact that it appears to work OK, has been good for morale.
As was mentioned in a previous blog we've discovered that 'our' Ensign differs in a few minor ways; to the normal production model. One example of this is the fitting of front disc brakes, the workings of which required some attention. The condition of the discs was poor, so they had to be re-skimmed and after some consideration and in the interests of safety, a complete new brake servo unit was acquired and fitted.


The final piece in the interior jigsaw was the refurbishment and fitting of the seats. Although badly faded, except for a tear in the rear seat cushion, all were in a reasonable condition. Following a thorough clean with an appropriate solvent and with the rear seat cushion repaired, all the seats were sprayed with special seat paint. Several coats, which amounted to five tins, were applied and everyone agreed the result was excellent.
With the interior now virtually completed, attention returned to the engine, following its successful start-up and gentle running in the Museum’s workshop. We’re fortunate that with large car parks and a perimeter road at the Museum site, we have our own private road test facility. Whilst the engine continued to run well on its first short trips, it quickly became evident that there were both oil and water leaks that needed investigation and attention. A thorough examination on the workshop ramps revealed the main oil leak was coming from the area of the rear crankshaft. So, back at its home in the Collections Centre, work began on finding the cause, with removal of the clutch assembly and flywheel. A loose internal core plug at the rear of the crankshaft was found and oil had clearly leaked into the bellhousing. More runs around the site were completed with follow up checks and adjustments on the workshop ramps.
When the volunteers were satisfied that the general operation of the car was OK it was handed over to the Museum’s workshop manager for a thorough check. A snagging list was then prepared of items that needed attention before the car could be sent for its MOT test. Nothing serious was discovered and after several weeks spent adjusting, replacing and repairing minor items the Ensign passed its test on 4th February 2019.


The above photo shows the fourth and final A4 logbook that was completed by the volunteers over five and a half years working on the Ensign, plus its MOT certificate. The finished car is pictured on one of its several trips in and out of the Museum’s workshops. During the next few weeks the car will receive a bit more tender loving care before it is formally handed back to the Museum for display and trips to local shows and events which the volunteers attend.
1960 STANDARD ENSIGN (Part 16)
Assembly now well underway
It’s been some time since our last blog on the Ensign, which covered the decisions and processes regarding the vehicle painting. Whilst some areas of the bodywork will still require final attention, the rewarding job of assembling all the components, including the engine, is now well underway.
The saying goes, “every picture tells a story” and the following photos clearly illustrate some of the work the restoration volunteers have undertaken recently. It is perhaps worth reminding readers that this whole restoration project has been done by different teams of volunteers working on different days, and been coordinated by a log written up after each day.


The first of these photos shows the new door seals that were required being fitted. The second shows glue being applied to the roof interior prior to the sound proof padding being attached. At this stage the car was still attached to the swivel vehicle frame, which allowed the car to be worked on at various upside down angles.


With most of the wiring now installed in the car, things like the front and rear lights can be fitted
Following the installation of the engine, the gearbox has now been fitted as well. As you can see the interior wiring looms are now all in place, so one of the next tasks will be to fit the dashboard and all the instruments.

So, as this last photo shows, our Ensign is looking something like its original self again. There are still a lot of fiddly jobs to be done and a few minor problems to solve, but at long last the end is in sight.
Don’t forget when visiting the British Motor Museum you can see the Ensign being worked on. It’s situated on the first floor of the Collections Centre and the volunteers will be only too happy to chat to you and answer any queries you may have.
1960 STANDARD ENSIGN (Part 17)
Fitting the fiddly bits and the engine fires
Progress on the Ensign has been quite slow recently, due to the time involved reassembling all the fiddly bits on the car. Everything was photographed when the car was originally stripped down and this pictorial record, plus the extensive workshop manual we acquired have proved invaluable as the rebuild has progressed.
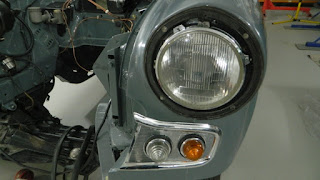
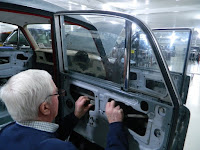
The fitting of things like door seals, lock mechanisms, wiring looms, brake pipes, steering column and engine ancillaries has taken many hours. Even what should have been the fairly straightforward job of refitting the front and rear windscreens was not without its problems. New rubber seals had to be sourced and then cut and the actual fitting process required a bit of expert help from the Museum’s workshop staff.


Fixing the door lock mechanism and inserting the chrome strip in the rubber window surround
 |
The engine complete, with new brake servo (left) and refurbished radiator
|
So, with the engine now fully installed, which on an initial test, appears to run OK, another milestone has been reached on this long and difficult project. There’s still a lot of work to be done on fitting out the interior, but 2018 should see the Ensign on the road again.
1960 STANDARD ENSIGN (Part 18)
The engine runs and the car moves – a big day
Our last blog described how, for just a few seconds, the restoration volunteers finally managed to fire up the Ensign again for the first time in many years. However, because the car is located on the first floor of the Collections Centre in the public viewing area, any further running would have to be done in the workshop. So recently, following a final check over and the completion of the instrument wiring, the car was ready for its short decent to the workshop below.

The Ensign on its way down to the workshop in the vehicle lift
As the photos illustrate there was a good turnout of the restoration team, who were on hand to help or just watch this big test of their hard work. So, with space cleared in the workshop, connection to the exhaust extraction system in place and around two gallons of petrol added, everything was set up for the big moment. Whilst the team could smell petrol, they weren’t totally convinced it was finding its way via the pump into the carburettor and the engine initially lacked any sign of life. However, a quick check of the still exposed fuel tank and then a look at the workshop manual confirmed that the car’s reserve tank tap was in the off position!


First jobs – connect the exhaust to the extraction pipe and then put some fuel in
With this discovery, faces lit up and on the third attempt the engine fired up much to everyone’s relief. This procedure was repeated several times with the engine, initially at least, seeming to run very smoothly. There were no fuel leaks and apart from a badly fitting radiator cap, no water leaks. The temperature gauge appeared to be working OK, as was the heating system, but the fuel gauge is going to need some attention.


The engine soon fires up again, while the throttle linkage is adjusted and water circulation checked
The Standard Ensign starting for the first time.
The final test of the day was to see if the gearbox and clutch were both OK and working. The gearbox, save for an oil change, is the only component which has not received any attention so far, so fingers were crossed. Although our time and space was limited, the car successfully propelled itself a short distance forwards and then backwards - again to the relief of everyone.

Most of the restoration team were on hand for the big day and look suitably proud
The car remains on display on the first floor of the Collections Centre and during most weekdays the restoration team can be seen working on it. They’re always happy to chat to any interested visitors and maybe help with any restoration and repair queries in general.
1960 STANDARD ENSIGN (Part 19)
It’s been some time since our last blog on the Ensign, as progress with some of the final tasks has been slow. This relates to three main areas; preparing and fitting the interior trim, investigating and fixing oil and water leaks and attending to a long snagging list, prior to the car’s MOT test.
The trim fitting cannot be rushed and of course this has to be done in the right order. Items such as the dashboard, glove box, courtesy lights and switches, door window winder mechanisms, locks and springs take time to fix and adjust. Then there are the door cards and cappings to fit, together with all the handles, levers and locks. New red carpet and underlay were acquired for the boot and cabin floor. The cutting and fitting took a lot of time and patience, but it really started to transform the look of the interior.


With the interior now virtually completed, attention returned to the engine, following its successful start-up and gentle running in the Museum’s workshop. We’re fortunate that with large car parks and a perimeter road at the Museum site, we have our own private road test facility. Whilst the engine continued to run well on its first short trips, it quickly became evident that there were both oil and water leaks that needed investigation and attention. A thorough examination on the workshop ramps revealed the main oil leak was coming from the area of the rear crankshaft. So, back at its home in the Collections Centre, work began on finding the cause, with removal of the clutch assembly and flywheel. A loose internal core plug at the rear of the crankshaft was found and oil had clearly leaked into the bellhousing. More runs around the site were completed with follow up checks and adjustments on the workshop ramps.
When the volunteers were satisfied that the general operation of the car was OK it was handed over to the Museum’s workshop manager for a thorough check. A snagging list was then prepared of items that needed attention before the car could be sent for its MOT test. Nothing serious was discovered and after several weeks spent adjusting, replacing and repairing minor items the Ensign passed its test on 4th February 2019.

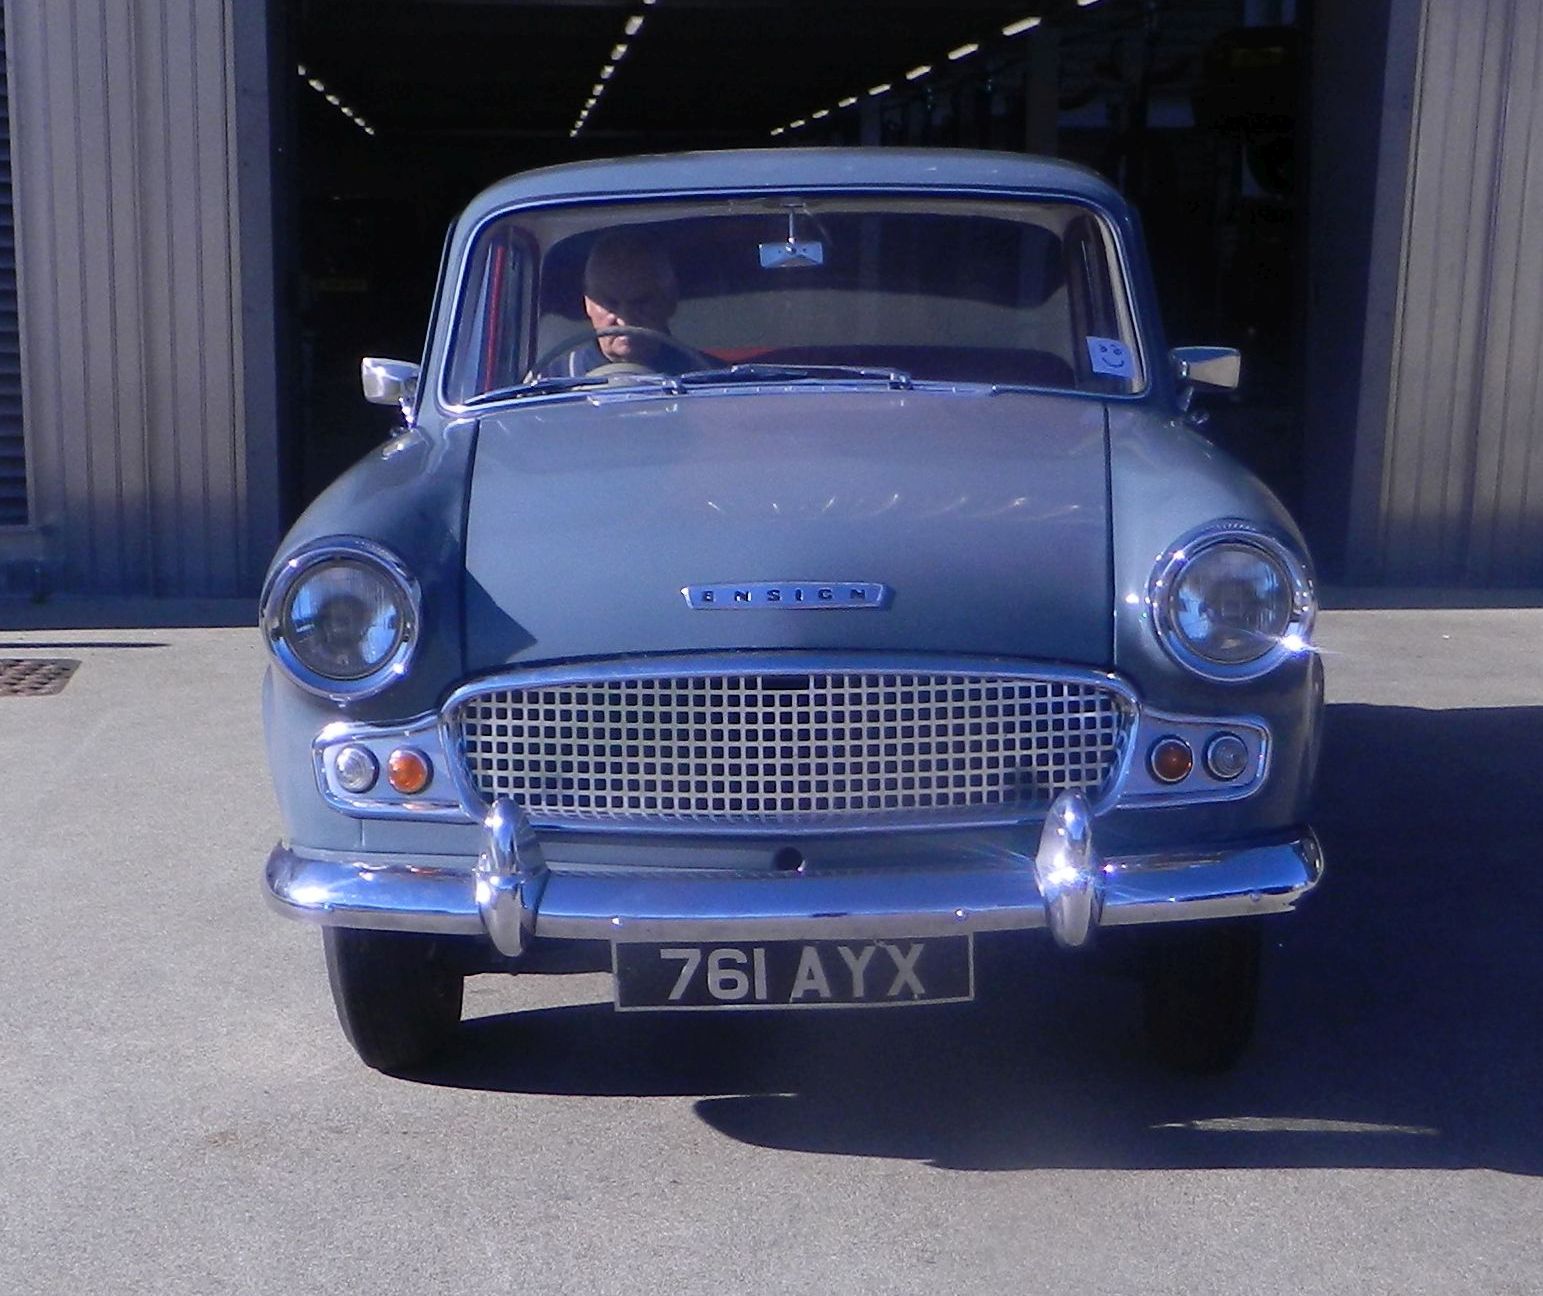
The above photo shows the fourth and final A4 logbook that was completed by the volunteers over five and a half years working on the Ensign, plus its MOT certificate. The finished car is pictured on one of its several trips in and out of the Museum’s workshops. During the next few weeks the car will receive a bit more tender loving care before it is formally handed back to the Museum for display and trips to local shows and events which the volunteers attend.
No comments:
Post a Comment